Select date

A How-To Guide For Installing A Home Garden


by Chris Martenson, Peak Prosperity:
 If you’ve been intending to become a gardener but aren’t quite sure yet how to get started, this how-to guide is for you.
It chronicles the steps that I successfully followed to put in my own garden this year, in my spare time, all while working hard on the Peak Prosperity business as well as traveling frequently for work. From start to finish, it was a 1-manpower project – showing that if I could get this done on my own given my crazy work schedule, most anyone can do this, too.
Hopefully this guide will give you the direction, inspiration, and confidence that you, too, can be tending your own well-constructed garden beds soon.
Plan Your Work
Site Selection
To thrive, garden plants need sun, water, and good soil. Taking the (short) time to identify a site that offers the best combination of all three will dramatically increase your odds of successfully growing food.
During the prime growing months (May-Sept in the Northern Hemisphere), inspect your property for sites that offer the most sun exposure throughout the day. From those options, look then at the sites with the best drainage.
Worry less about the soil conditions at first, because you can control that easier than the prior two variables by using raised garden beds. But by all means, if you have sites of equal sun/drainage rating but different soil quality, pick with the one with the better soil (most vegetables like a sandy loam consistency).
If you have more than 0.25 acre of land on your property, then another factor to consider is proximity. You’ll be making a lot of trips to your garden over time, so picking a convenient spot relative to your house (your kitchen and tool storage area, in particular) will result in reduced schlepping, which your future self will be awfully appreciative of.
In my case, I selected a spot tucked into the corner of my yard nearest the kitchen door and tool shed. It’s not the sunniest section of the property, but it still gets about 80% of the day’s sunlight while being easy to access. Months later, I remain very happy that I made this trade-off.
Here’s a picture of what the plot looked like before I started work on it:
Make Your Measurements
Measure twice, cut once, the wise carpenter advises. This applies just as well to gardeners.
Once you’ve determined where your garden is going to go, then it’s time to start visualizing the specifics about what it’s going to look like.
If you’re going to be taking this on as a one-manpower job, like I did, it’s better to start small. You can always expand upon your initial plot in future years.
In my case, the spot I selected provided enough space for a 22′ x 17′ garden footprint. In my opinion, that’s plenty of room for a first-time gardener to handle.
With your footprint perimeter in mind, start brainstorming how to best use that space. How many beds can it accommodate? Do you want a few large beds, or many small ones? What do you want to grow? Where in the garden do you want to grow them?
Get some paper. Or use a whiteboard. Diagram it out.
Once you have something visualized, show it to other gardeners. Bring it down to your local nursery. Ask experienced folks for their opinion. You’re sure to get some good feedback that will improve your plans.
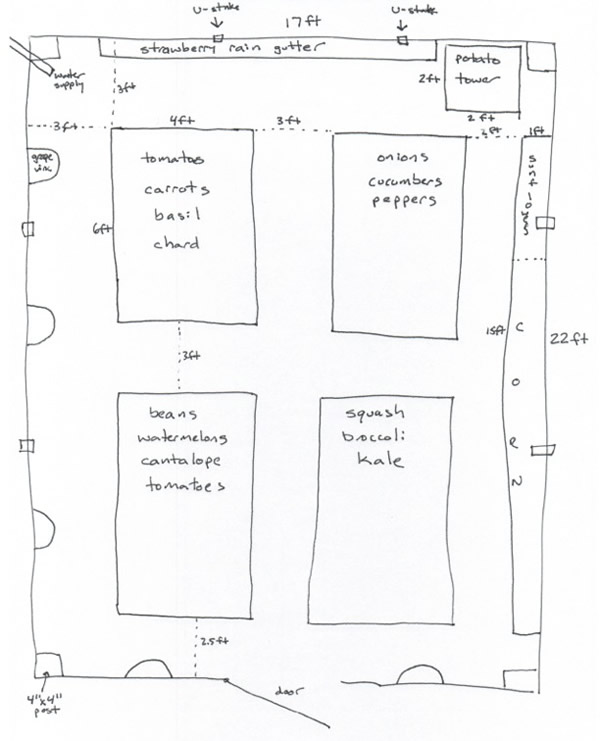
Here’s the rough sketch I made for my garden:
With your visual plans now in hand, head out to your plot with measuring tape, a ball of twine, and a handful of stakes. Begin by marking the perimeter of your garden, then progress inwards to mark exactly where the raised beds (and any other physical components) will be.
Read More @ PeakProsperity.com


