Select date

The Secret Salad Garden – Part 2


by D.G., Survival Blog:

GEAR AND MATERIALS:
SOIL
The first trays I grew using ordinary Central Texas yard dirt and the results were good. But dirt from outdoors can introduce mold, gnats, and other insects, so I have been using potting soil ever since. Professional growers will use various mixtures which might include perlite, vermiculite, compost, or coconut coir. Some grow hydroponically. Some add fertilizers and nutrients. It’s very likely that, by following their recommendations, or through experimentation, I might increase yield or see other benefits. But I’m satisfied with the results I’m seeing for now, and I suspect in any case that, during the short period between germination and harvest, the grow medium doesn’t matter too much, and that, apart from water, warmth, and light, most of what the plant needs is in the seed.
TRAYS
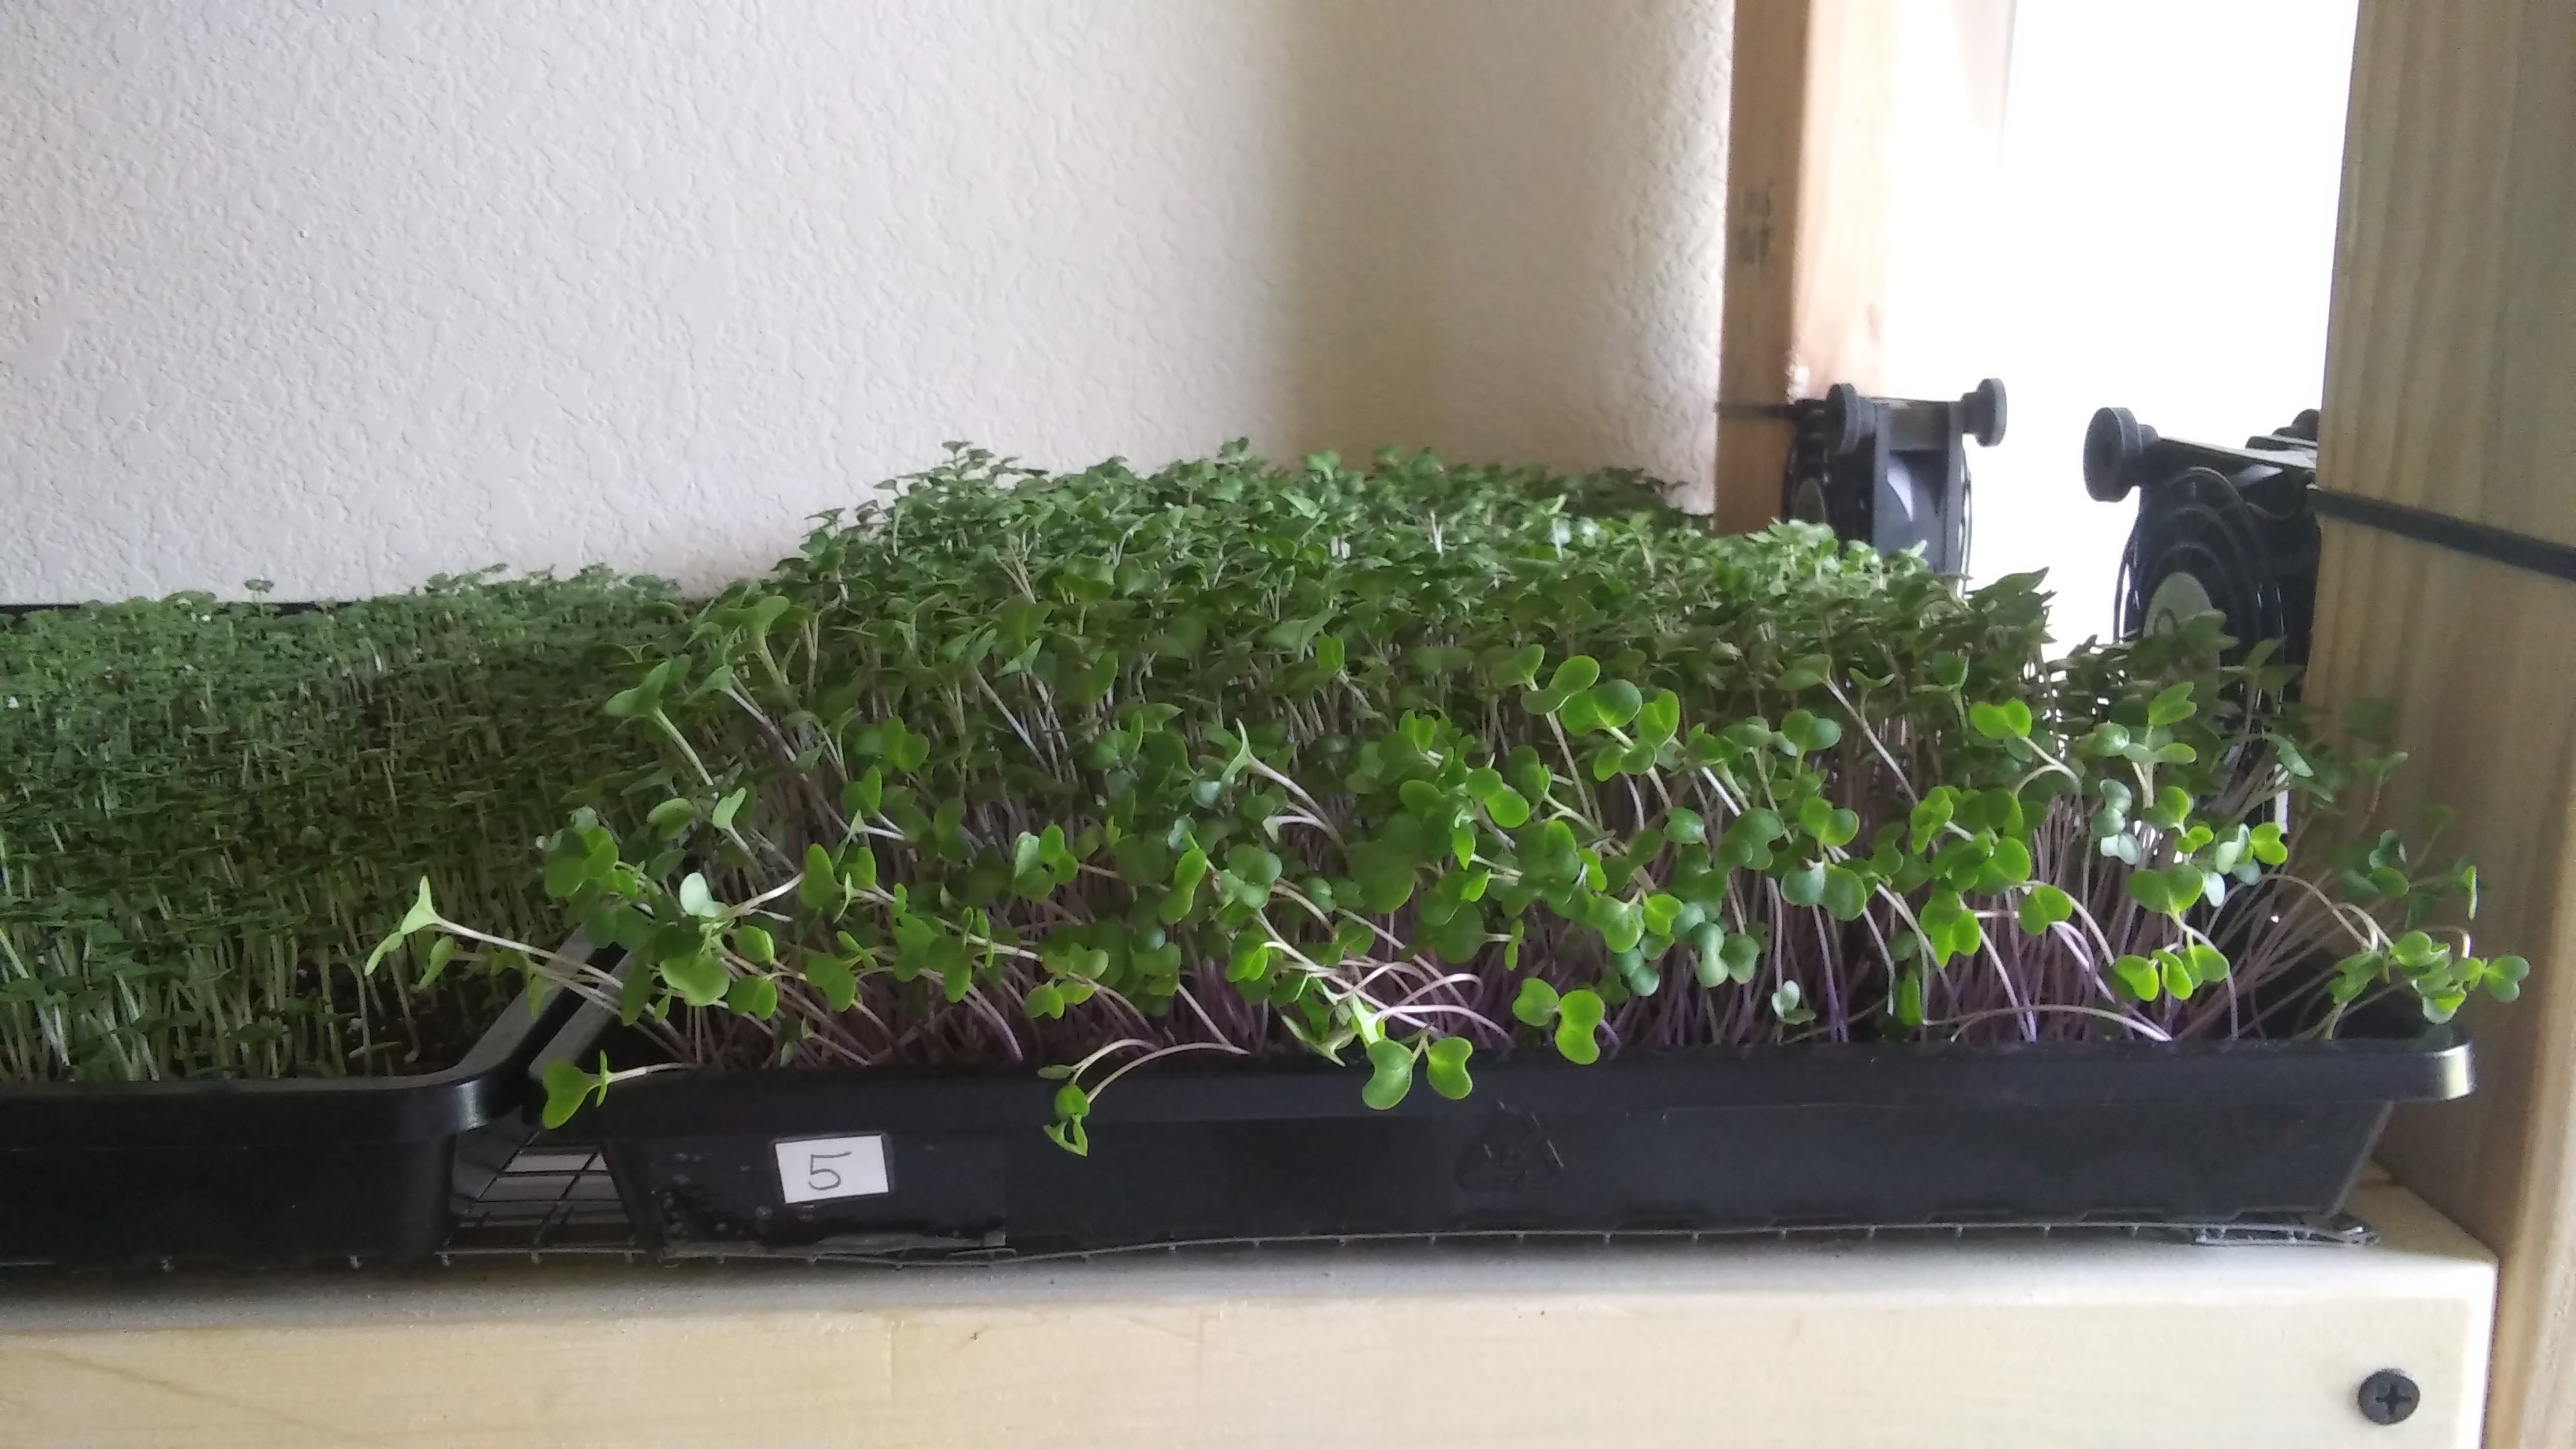
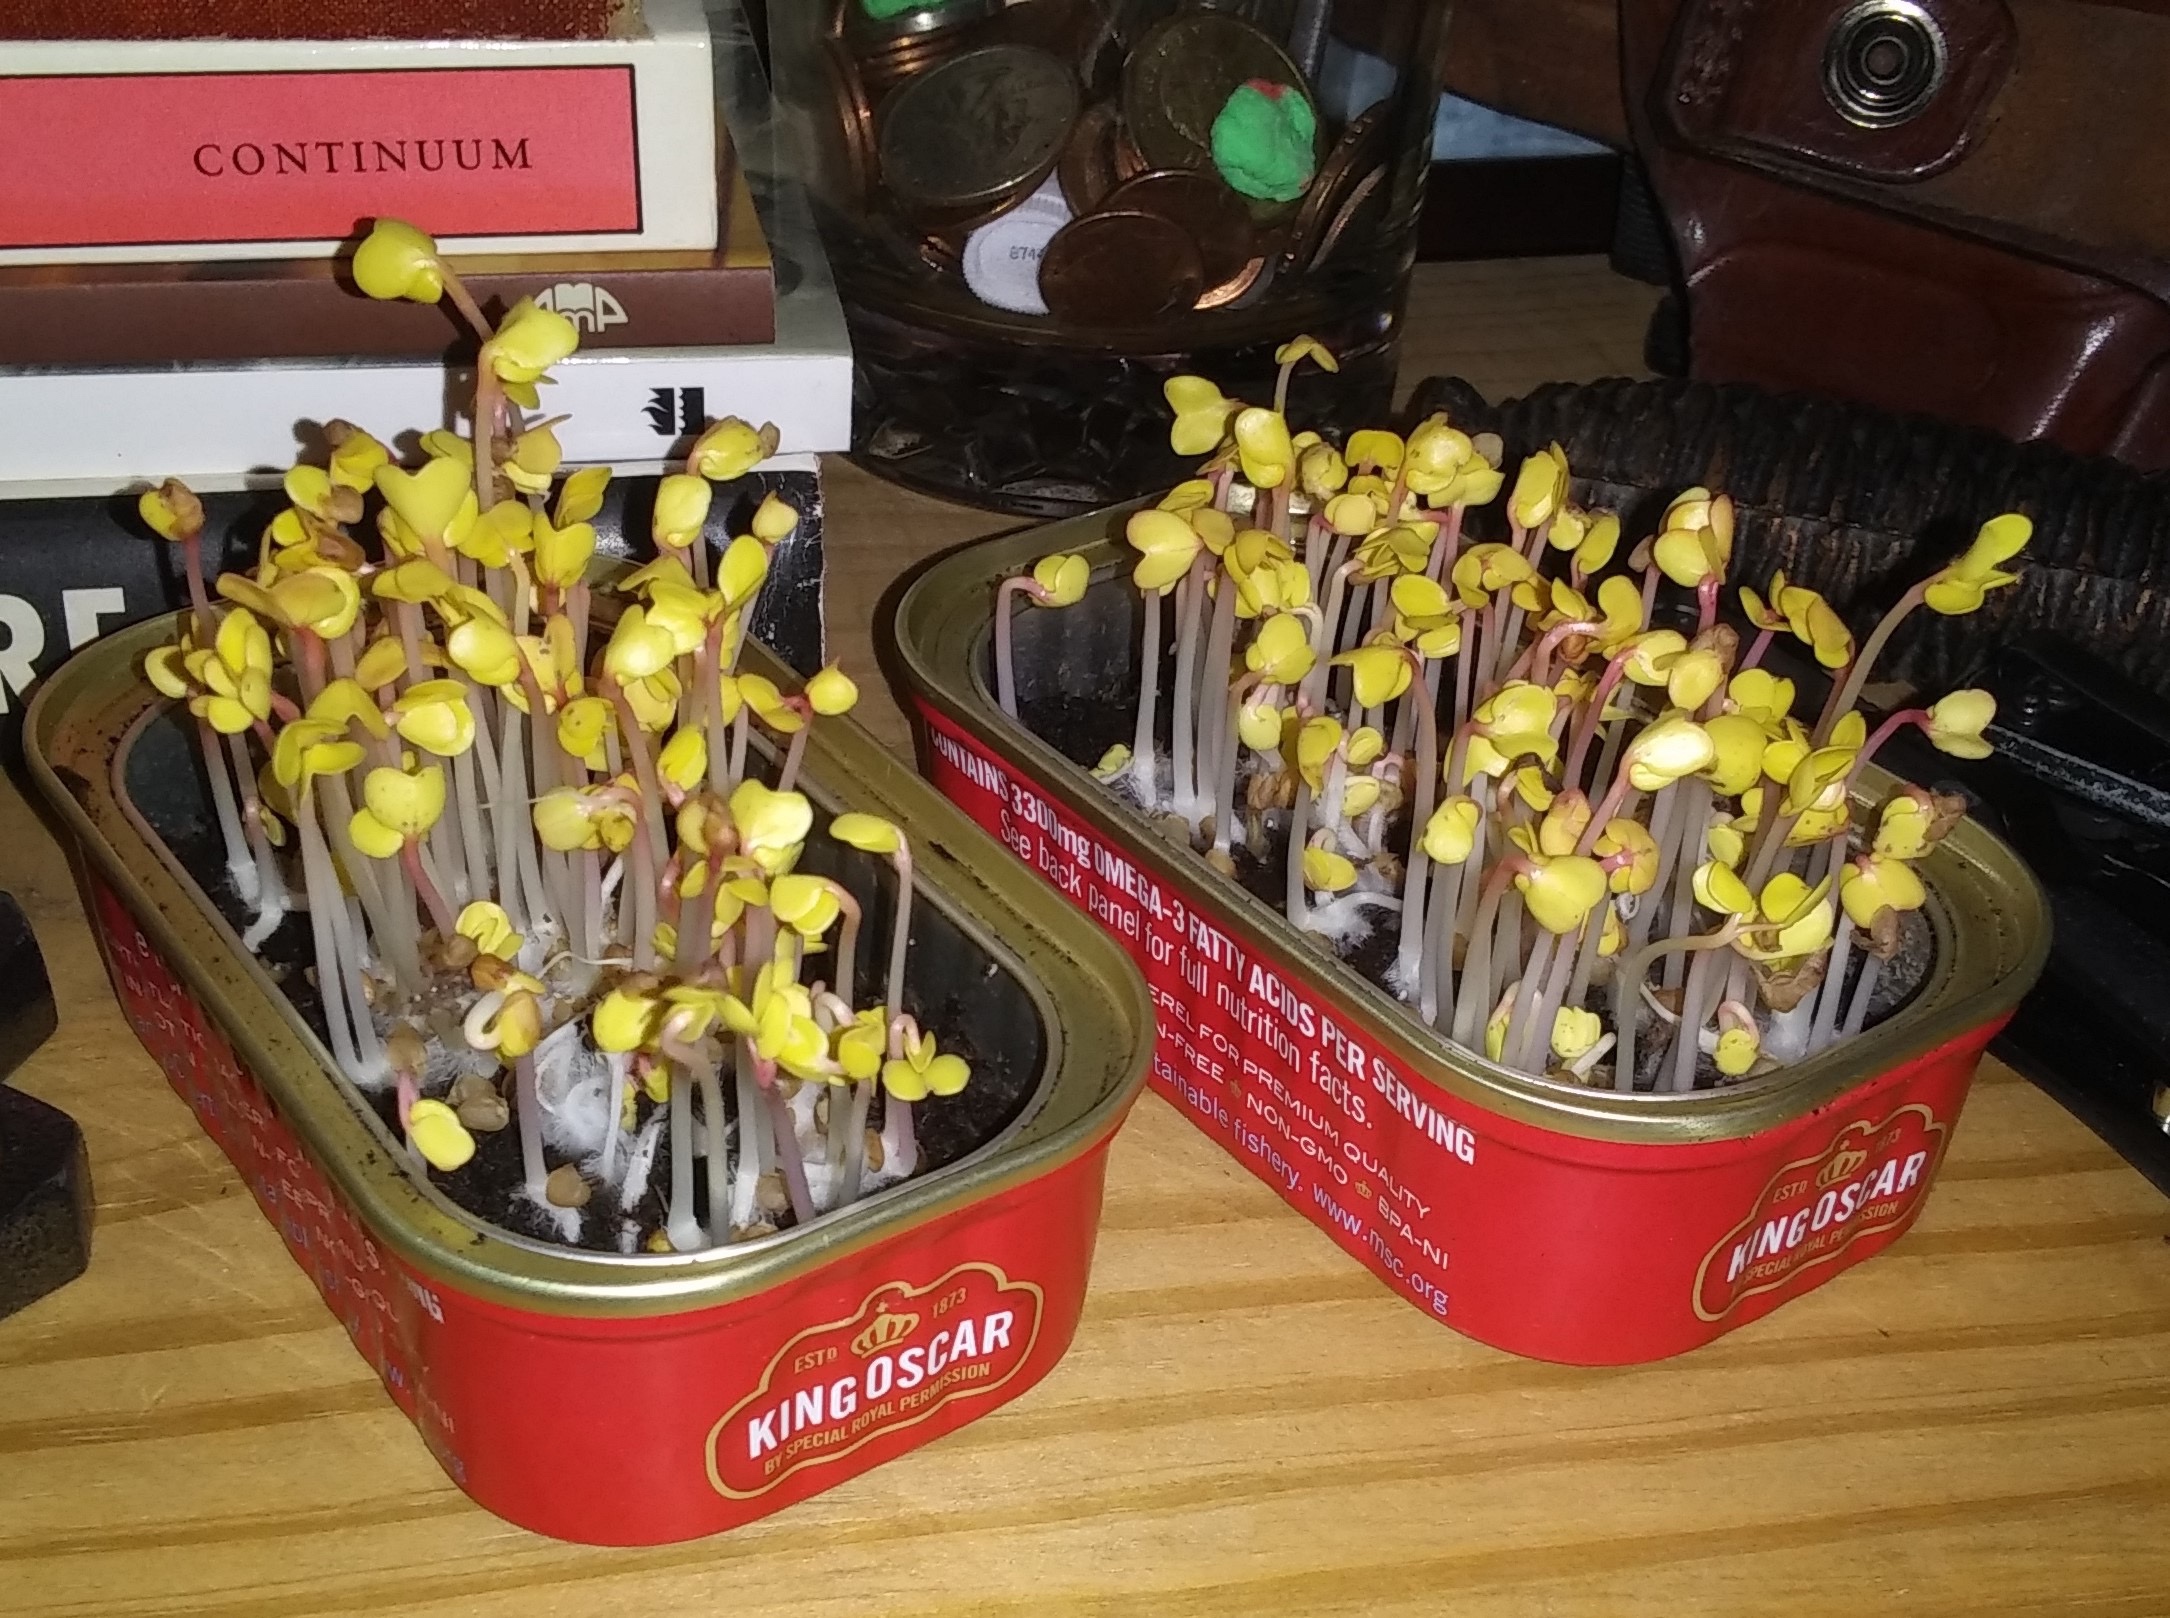
Special trays are absolutely unnecessary. Had I read Burke’s book in time I would not have initially purchased any 1020 trays. Burke uses tin foil baking pans and a variety of bowls. Really, any fairly shallow dish will work, in a height range of one to three inches (see Figures 7 and 8). I chose the 1020 shallow trays for two reasons. It is easier to get in close to the soil to harvest with scissors or a knife if you don’t have a tall rim in the way of your hand and, secondly, a high rim impedes airflow and this can foster mold.
I was concerned initially that with a shallow tray I wouldn’t have sufficient soil depth to sustain some of the plants that have a longer time until harvest, but this concern passed after I grew a couple trays of basil to a height of 4-5 inches over a four week period in only about ¾ inch of soil. And regarding drainage holes, the trays I use have none. I was concerned about this, too. Many growers, particularly the pros, prefer the trays with holes because they like to water with a technique called ‘bottom watering,’ i.e., setting the planted tray, with holes, into another tray, with water, and allowing the water to soak up into the root system from the underside.
One important advantage of this is that it prevents the development of mold. Microgreens tend to be grown densely, especially by the pros, who aim to maximize profit. Moisture is easily trapped under the ‘canopy’ when watering is done top-down. But I’ve been careful with how I water, as will be described later, and this has only rarely been a problem.
But I don’t regret the 1020’s I bought at all. I spent a little extra and got the heavy-duty variety. Barring their ad hoc use as tennis rackets I don’t expect they’ll ever crack, particularly as they are not spending any time out under our brutal Texas sun.
SEED
Most vegetable seeds remain viable for somewhere between one and five years. It would be a mistake to store them carelessly, or to lose track of their age. Probably the best practice, from a preparedness standpoint, is to make growing them a regular part of one’s lifestyle. Then, if the seed is treated like other stock, rotated and replenished regularly, at any given point in time, when some crisis develops, one would not only have a reasonably fresh store of seeds on hand, but also the practice of growing them already mastered. And these same seeds can of course be used to grow the plants in a regular garden to full maturity.
One reaction people have, upon learning about microgreens, is to the huge quantities of seeds involved. Yes, the process is seed intensive. The amount of seed required to grow a single tray could sow a whole acre. It seems wasteful until one considers the many examples of our plant-based foods that are seed-intensive, such as beans, rice, and wheat. Also noteworthy is the potential for growing one’s own seed. The author of the afore-mentioned book, Peter Burke, estimates that a 200-foot row of sunflowers would yield five or six gallons of seed, enough for a year’s worth of indoor tray farming. Seen in this light, the practice of growing microgreens indoors is potentially part of a larger, sustainable way of life, one that only looks unsustainable and wasteful in an isolated context.
WATERING EQUIPMENT
I water with a spray bottle and with a watering can. Professional growers, on the other hand, often advise against the kind of top-down watering I do, favoring instead watering from below, as described previously.
But I like the simplicity of having only one kind of tray, and bottom watering is likely to involve some water sloshing out of the tray, an unwelcome occurrence in a carpeted environment like mine. I take my trays, one by one, across the room to a tiled area and water them by hand.

I use a spray bottle the first few times I water, while the shoots are delicate, then switch over to using a small watering can. The aperture of the watering can is nearly a half inch in diameter, and this makes for a destructive, uncontrollable stream. The solution I’ve settled on is to cut the corner of a zip-lock bag, invert it over the spigot, wrap it down tight with a rubber band, and then make a tiny hole in the corner of the bag (see Figure 9). That makes for a thin, 1/8-inch stream which I can direct with some specificity, and it’s so thin it is much less likely to dislodge the soil and upset the roots. There are surely a few other ways to make such a modification, e.g., maybe a small length of rubber surgical tubing pulled over the tip of the spout.
The potential for rot is reduced watering this way because the canopy isn’t being saturated with a spray or a mist. Instead, a thin stream of water penetrates the foliage in only a few places. What matters is that enough gets through to the root system, where it can spread and distribute to all the plants. How much gets through depends on how many passes you make and how quickly or slowly you make them.
GROW RACK
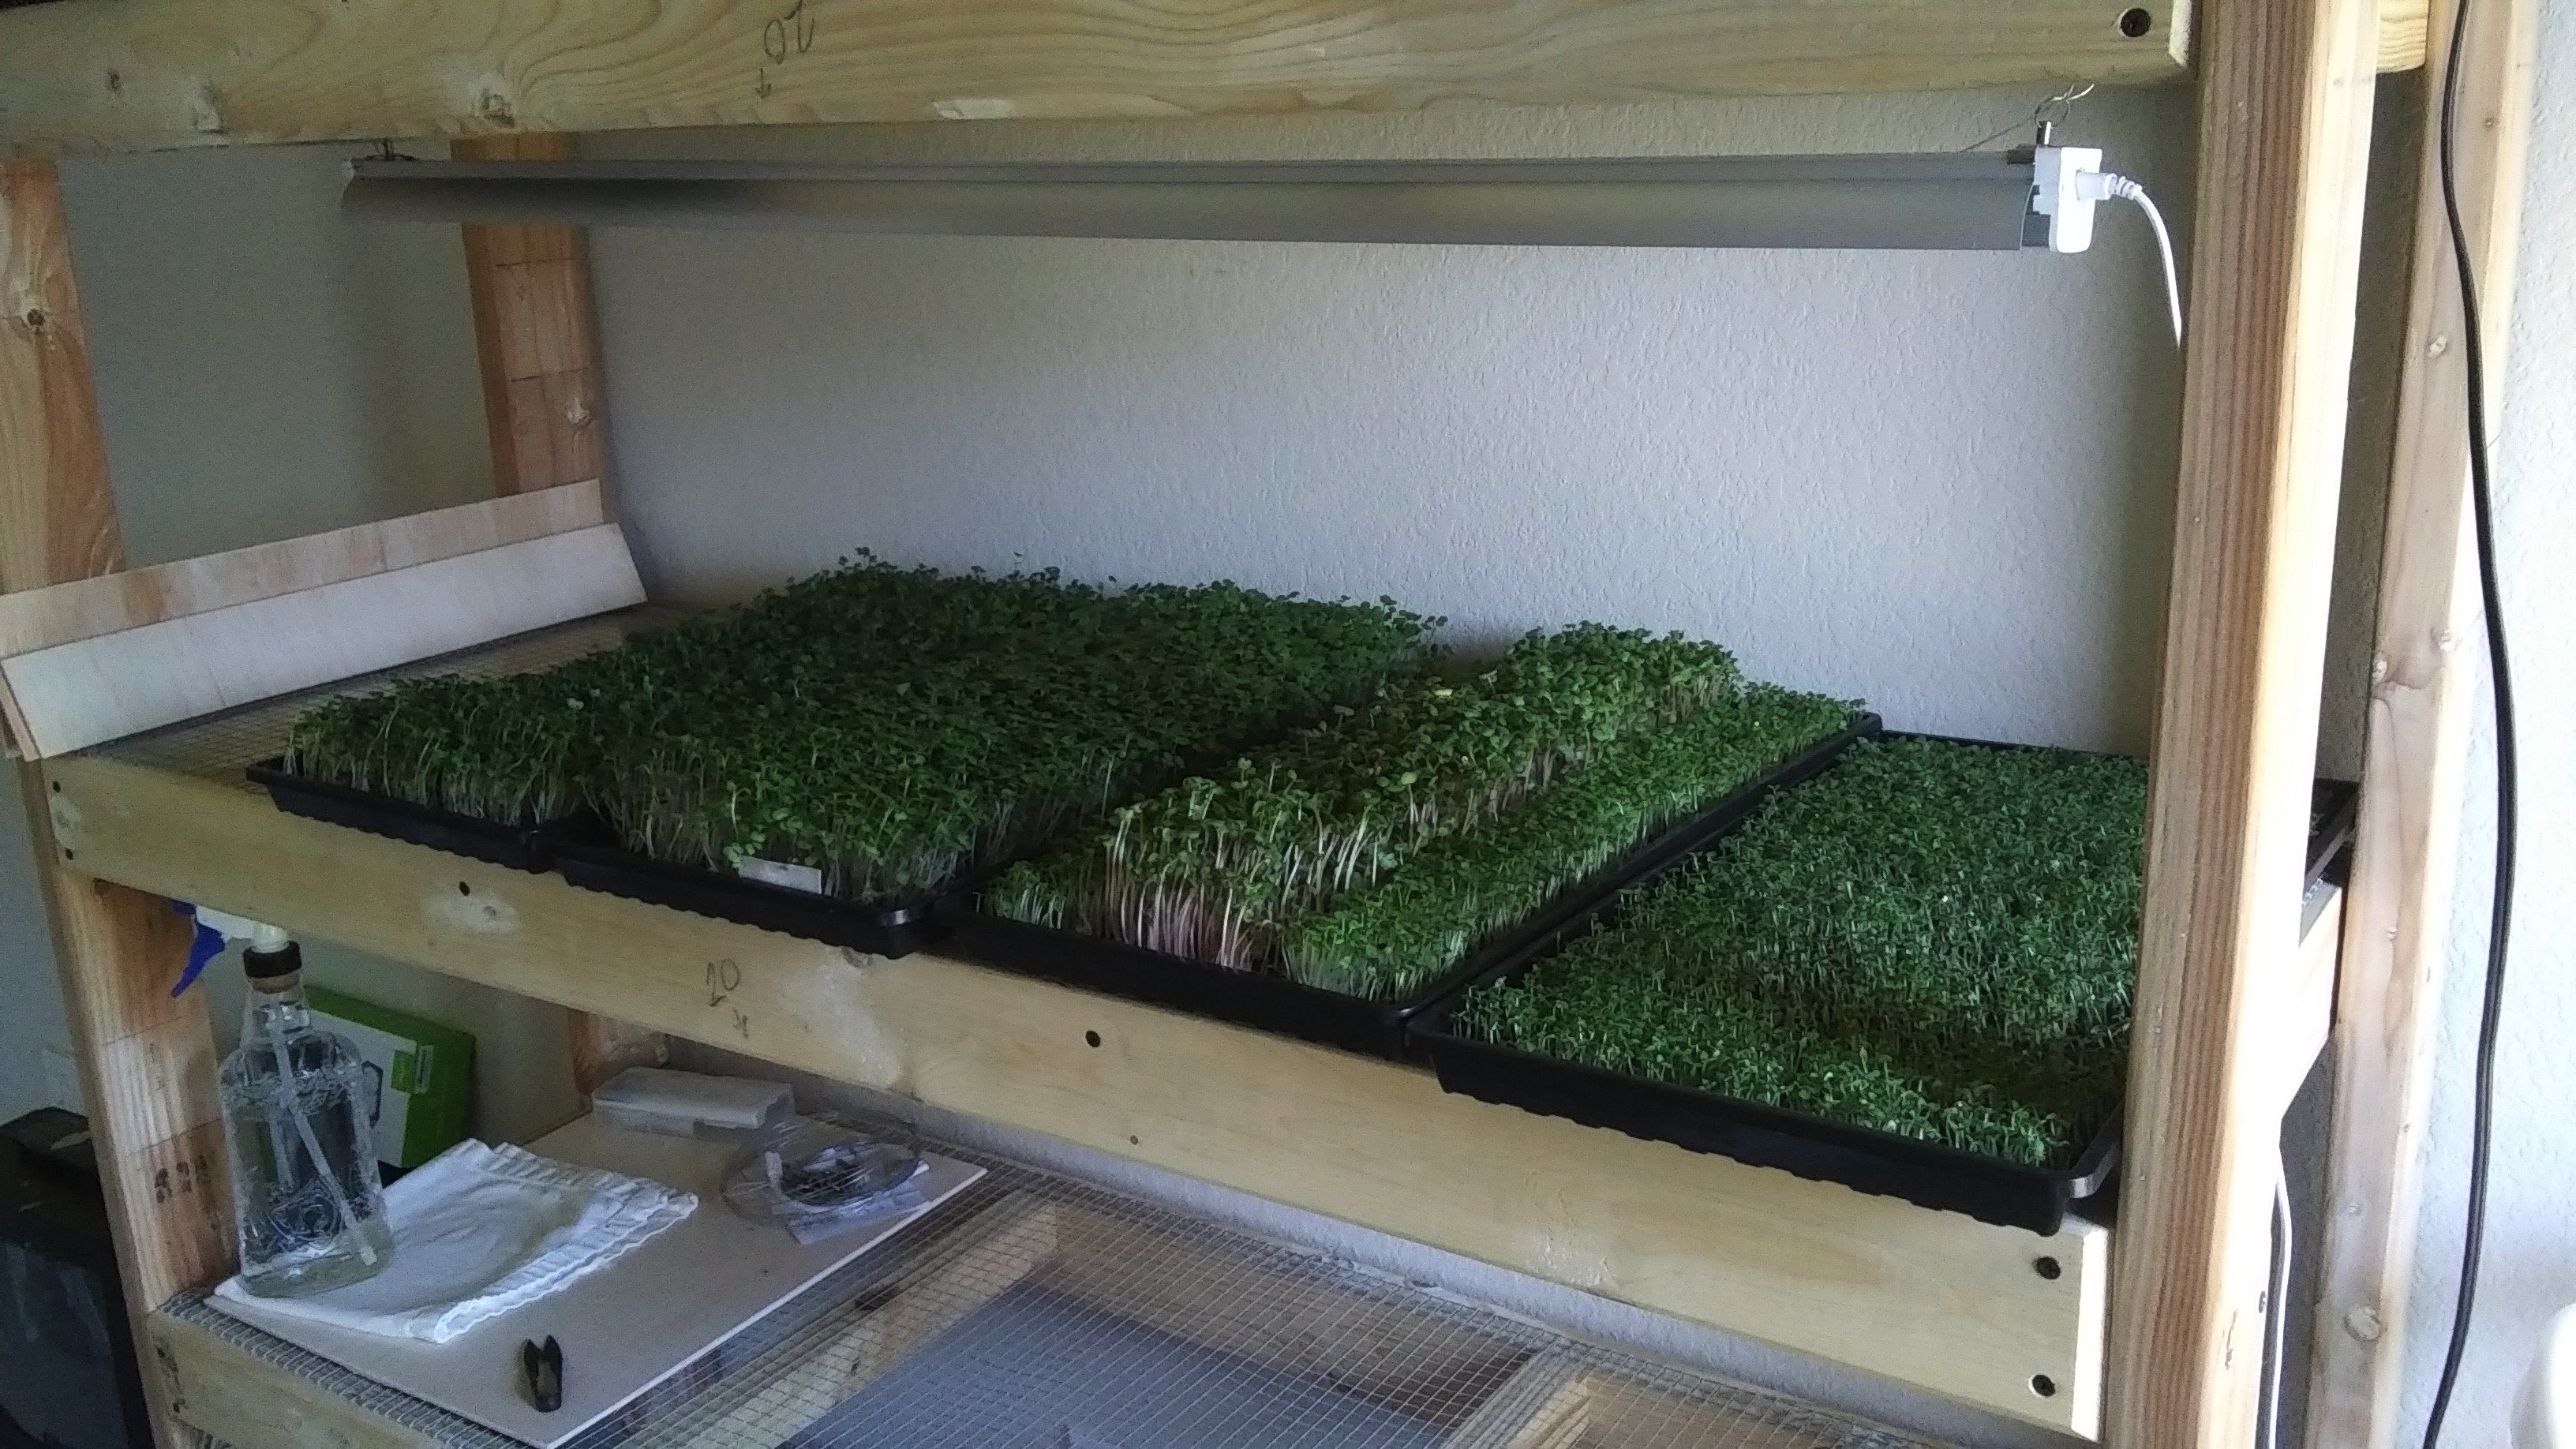
We live near a Home Depot and I would often stop on my way home from work to sort through the culled lumber which they sell for 70% off retail. Sometimes the damage is obvious, boards are wildly contorted out of square or badly split. But it’s not unusual to find many that are near-perfect and, since I build regularly, I tend to have a decent supply of lumber on hand. When the coronavirus came, I had enough lumber to knock together a grow rack about six feet tall, five feet wide, twenty inches deep (see Figures 10 and 11).

I had some galvanized hardware cloth on hand and that served nicely as a shelf surface. The rack has four shelves and can hold up to twenty trays, which is about twice as many trays as I have ever, so far, had in use at one time, but the extra shelves give me room to grow seedlings for an outdoor garden. The shelves are set at varying distances from each other, with the intent having been to move the trays to more widely spaced shelves as they grow, so that the distance from the plants to the grow lights is optimized. Looking back, I would have built it with adjustable shelves. Possibly also I would have set the lights with adjustable depth.
A grow rack isn’t absolutely necessary, though. The plants do well just by window light.
LIGHTS
A west-facing window in Central Texas this spring and summer has left me no insight into how the microgreens would fare without grow lights in winter or under other less sunny circumstances, but Peter Burke, whose book I’ve referenced, grows his microgreens in the winter without grow lights in New England, so I suspect you could do without them, too. Still, I have begun to think that growth is faster under the lights. In any case, they are inexpensive. Be forewarned, though. They are supposedly bad for your eyes. I have a sheet hung across the front of my rack when they are on.
